When it comes to bug bounties a lot of the web applications that are in scope are already under heavy reconnaissance by a large number of Bug Bounty hunters. So how do you get ahead of the pack, and get those sweet Bounties? Applications running on Android are not hunted as much due to the extra layer of complexity on getting it set up. So how do you get set up? Lets jump into the world of Android Application Security Testing with OWASP Zap.
OWASP Zap is a fantastic piece of opensource tooling that is great for the Bug Bounty Hunter. I have a number of guides on getting started with it. Take a look.
If, like me, you are visual person, I also prepared a video.
Software Set Up
Before you get started with Android Application Testing we need to get all the pieces together and do some configuration. Lets get started.
Operating System
I am running my set up on Ubuntu LTS Linux (22.04). Any modern Linux distribution should work fine.
Android Studio
You need to create a virtual environment to run the Android Virtual Device (avd). And Android Studio is perfect for this. So it’s pretty straight forward to install. You just download, extract and run it. However this is not a guide on how to install Android Studio. But it is very straight forward to do so.
Note: Android Studio also installs the Android Development Kit (Sdk) into your home drive. So it will it go into the directory ~/Android/Sdk/. It gives you an option during the initial setup if you want to change this location. For the rest of this post I will assume you didn’t change this location, as its required later on.
OWASP Zap
You will need Zap installed. I have already covered the installation of Zap over on an other post. You will find it here. Once installed come right back here.
Android Debug Bridge
The Android Debug Bridge or “adb” for short, is the tool we use on the command line to interact with our Android Virtual Device (avd)
This can be installed with the below commands
sudo apt update
sudo apt install adb
Create an Android Virtual Device
Once Android Studio is installed, proceed to launch it. You should be presented with a window like the below.

You will want to create a new Android Virtual Device (avd). So click on the “Create virtual device” link.

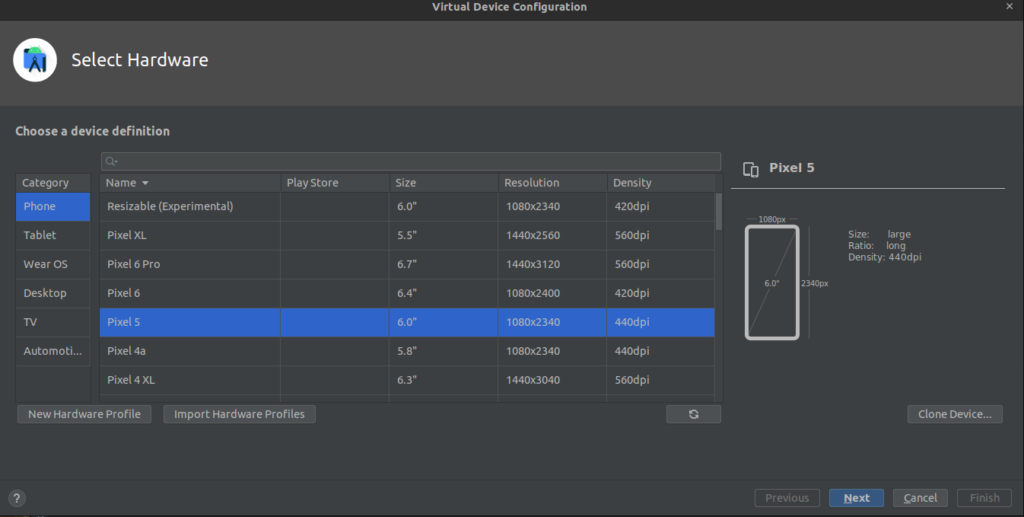
This is the stage where you have to pick the hardware you want to emulate in your AVD. I picked the Pixel 5 as it was an older model, which was less resource hungry, and would work fine on my PC. Go ahead and click Next

Now the version of Android has to be selected. I chose an older version of Android as I wasn’t testing Android, only the apps. So far it has worked great on my virtual environment.
Tips:
- The next button will not allow you to proceed until you download the version of Android you will use. Just click the little downward arrow beside the Version and it will start. Then you can continue and hit next.
- Do not pick any combination that will install the “Google play store”. This version is locked down and will produce an error when you try to make the /system folder writable later on.

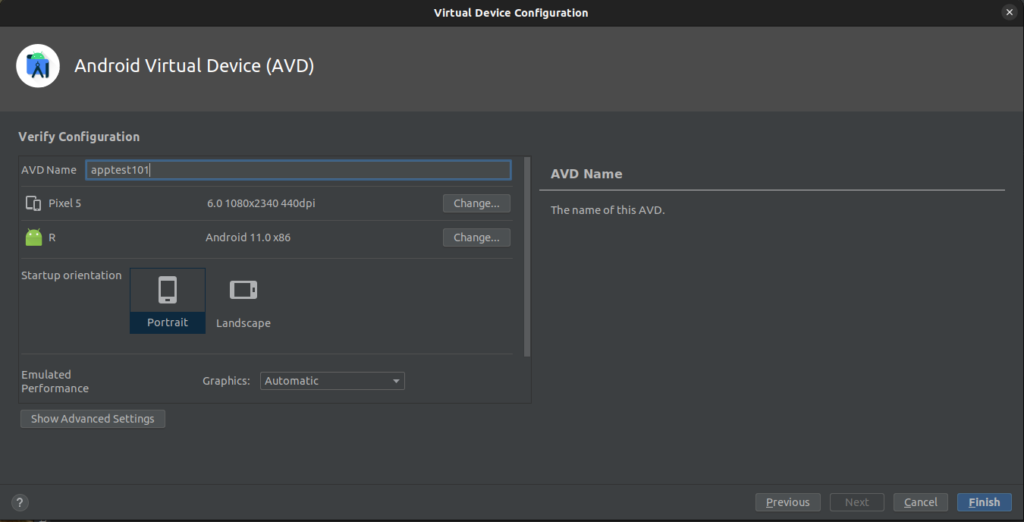
On this screen you can choose a name. Although it is supported, avoid putting spaces into the name of the AVD. It can cause some extra effort when using the command line later. Click the “Finish” button to complete the install.
Now its time to head on over to the command line and start our next layer of configuration.
Rooting the avd
The Android virtual device needs to be rooted, why? Because we need to install the CA cert from OWASP proxy as System Trusted cert and not just a user added Cert. There is a big difference and you can only do it on a device where there is read/write access on the /system folder.
The “emulator” command
The “emulator” command is installed as part of the Android SDK and should be (if you kept the default when you launched Android Studio), installed into ~/Android/Sdk. It is used to manage (start/stop) the AVD from the command line.
Using the terminal, browse to the folder ~/Android/Sdk.
cd ~/Android/Sdk

Tip: When using the “emulator” command, always stay in this directory. However, you can configure all your PATH environment variables, but I didn’t see a need to.
If you would like to do this, the below should work
export PATH=$PATH:$HOME/Android/Sdk/platform-tools
export PATH=$PATH:$HOME/Android/Sdk/emulator
So first run the command so that you can see it’s working.
./emulator/emulator

The “emulator” command can list all the available Android Virtual Devices.
./emulator/emulator -list-avds

Here you can see the Android Virtual Device we created earlier.
Starting up the AVD
The avd can be started with the emulator command.
./emulator/emulator -avd apptest101 -writable-system
Lets take a look at the options.
| Option | Meaning |
| -avd | The Android Virtual Device we will work with |
| -writable-system | By default the /system folder is read only. We need to be able to modify this in order to add our Zap CA file. |
Run the command to see the AVD start up.

You should be able to see your virtual Android phone on your desktop and you can interact with it using your mouse.
The “adb” command
The mouse is not the only way to interact with this virtual device. There is also a command called adb (Android Debug Bridge) that allows you to interact with it via the command line. Running the below “devices” option will show available Android Devices that we can interact with.
adb devices

As there is only one device running we don’t have to select a device. This can be tested by getting a command shell on the AVD.
adb shell

You can quite with the exit command
exit

Make “/system” writable
To add the CA cert for OWASP zap we need to make the /system folder writable. Since Android 7 (nougat) Trusted System CA Certificates are a bit harder to add and applications will ignore user added ones by default. We can get around this by adding the zap CA cert as one of the Trusted System Certificates and this can only be done on a device where “/system” is writable. So lets do it.
From the command line make sure all “adb” commands are run as root.
adb root

Now disable the “Android Verified Boot (AVB)“.
Tip: If you do not do this step, the AVD will become unbootable.
adb shell avbctl disable-verification

Now disable the dm-verity checking on USERDEBUG builds.
Tip: If you do not do this step the “remount” option for adb will fail.
adb disable-verity

Tip: If the previous two steps are not done the reboot will fail and you will need to restart from the beginning.
Now reboot the device.
adb reboot

All going well and you followed the instructions, the device should reboot. This can take a few minutes.
Once the Android Virtual Device is back, run the “adb root” command again. This ensures our commands are run a the “root” user.
adb root

And finally a remount command.
adb remount

The “remount” option to adb will remount the file system containing the /system folder as read/write and we can proceed with adding the CA cert as a system Trusted Certificate later.
Adding the User CA Certificate
Once “/system” is ready for writing, its time to add our CA Certificate from zap. First open the Zaps option page, and go to Server Certificates in the Network section.

Click the save button an put it some where you can find later. I put it into the /tmp/cert/ directory and called it “owasp_zap_root_ca.cer”.

The “adb push” command can be used to upload the CA Certificate onto the Virtual Android device.
adb push /tmp/cert/owasp_zap_root_ca.cer /sdcard/Download


At this stage we have to go onto the Virtual Android Device and add the Cert via the Graphic Interface.
Open the “Settings” menu and go to the “Security” Section.

Then onto the “Encryption & credentials” menu. Open the “Install a certificate” menu and then select “CA certificate”

Then pick the the cert we uploaded earlier. It will be in your Download folder. There might be a warning but install it anyway.
Update Proxy Settings on the Android Virtual Device
Now there is a user certificate loaded we can test if its working. On the AVD you will find the settings menu under the three dots.

Go to the Network section and set your Proxy to be the same as in OWASP Zap.

In Zap you can find this information under “Tools, Options, Network, Local Servers/Proxy” section.

Make sure the ports are the same.
Testing the user uploaded Certificate
Testing the certificates is as easy as launching the browser and testing you can go to websites and that they are being captured in the Zap history window.
As you can see in the screen shot below, https://www.yahoo.com was captured perfectly.

However good this is for web browsers, it will not work for applications. Google restricted user uploaded CA certs so they will not work with applications. Lucky we have a way around this.
Making Apps Trust the OWASP Zap CA certificate
Since we previously have made the “/” file system read/write in our AVD we can just copy the cert we uploaded to a location that Android stores its system Trusted certs. When we added our user CA Certificate earlier on, Android changed the name of it. We need to find this file and copy it to right place.
The below command will pull the folder with all the user uploaded CA Certificates into our current working directory.
adb pull /data/misc/user/0/cacerts-added/

In the directory “cacerts-added/” we can find the cert we uploaded, which was renamed to “73ca5096.0”
We can just copy this file into the directory “/system/etc/security/cacerts/”
adb push 73ca5096.0 /system/etc/security/cacerts/73ca5096.0

At this stage are nearly done, and all that is left is testing that its all working.
Android Application Security Testing with Zap
What better way to confirm that the Android Application Security testing is ready ,than just installing an app and watching it progress in the Zap history window. We can use the f-droid application to test with. Download it somewhere local and you can install it with adb.
adb install ./F-Droid.apk

This will install F-Droid is

Now Launch the app.

Straight away in the history section of Zap you can now see all https/http traffic of the application we just launched in our Android Virtual Device.
Wrap Up
This concludes this long write up on Android Application Security Testing with OWASP Zap. I hope you got some value out of it and please some a comment below or look me up on Twitter.
Links
- Install OWASP Zap on Linux
- Set up Chromium in OWASP Zap
- Set up Firefox in OWASP Zap
- Interactsh on OWASP Zap
- Adding OWASP Zap to your Linux Launcher
